Posts
-
The Killer Bee Project: Dry Run
No matter how a project starts, one can expect there to be some number of remaining open questions and conflicting conclusions as you cross the finish line. No one, outside of mathematics, gets certainty in knowledge, so do not expect such here. The best that can be done in this case, for this particular kind of knowledge, is careful running of an experiment multiple times; refining techniques, and iterating as needed.
-
The Killer Bee Project: Introduction
Current (2025) CMP Service Revolver rules are silent with regard to style or weight of projectile to be used for the match. So long as the revolver is chambered “from 9mm/.38 Special to 45,” the shooter is free to select either a lead, coated lead, or jacketed bullet in whatever weight they choose in whatever profile they choose. This is quite unlike the NRA Distinguished Revolver ammunition requirement, where a 38 Special, 158 grain round nose or semi-wadcutter bullet, is de jour.
As a result of the wide latitude in the CMP rules, I started working on what I have been calling “The Killer Bee Project.” Initially, the hope was to create a new load that would do three things:
- Be accurate.
- Be (very) low-recoil.
- Be appropriate for new shooters.
In general, none of these goals are surprising. The first item is the de facto standard for choosing your ammunition. The next two items, while certainly not necessary, are “nice to haves.” My interest in the second two stems from not only the fact that juniors and competitors with joint damage, strength, or medical issues would appreciate having a low recoil load to practice and compete with; but also would potentially make it possible for them to compete in the first place. Another benefit from low recoiling loads is that they give the shooter a bit more opportunity to see the sights during firing, which helps shot calling development.
No doubt the criticism here would be that 38 Special 148 grain wadcutters would solve for all of the above, are (mostly) readily available store bought, and reloading isn’t strictly necessary to achieve good enough accuracy. These are all fair points to make, and certainly may influence and factor into your decisions around shooting CMP Service Revolver matches. Do what makes sense for you.
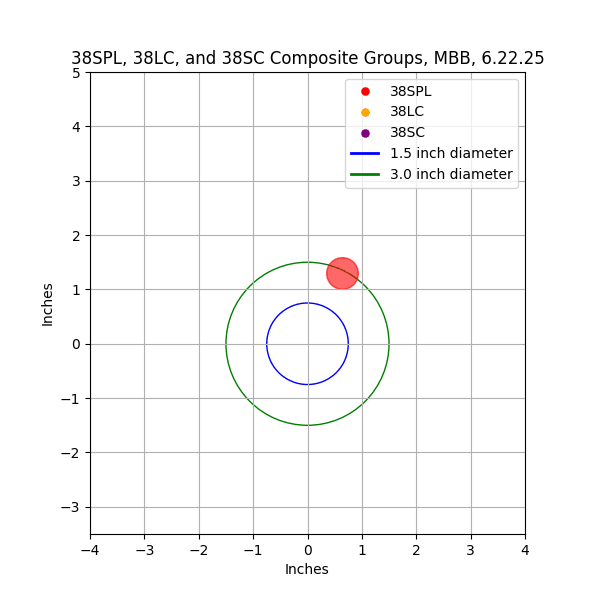
As the initial work on the experiment got underway, which began by choosing the 38 Short Colt case (hence the name “Killer Bees” due to the diminutive size of the completed round) for the parent round, research was done to determine what sort of load development would need to be completed along with reading across the internet to see if anyone was using what is an otherwise obsolete case. In so doing, I came across this article which discussed using the case for some of the action disciplines, like ICORE and USPSA. The problem those shooters are looking to solve is how to shave off reloading time using a shorter case (the case could clear the cylinder on ejection faster than a longer one) but still being able to make the various power factor requirements. Neither of these are constraints in our use case; there is no reload on the clock and there is no power factor minimum in our matches.
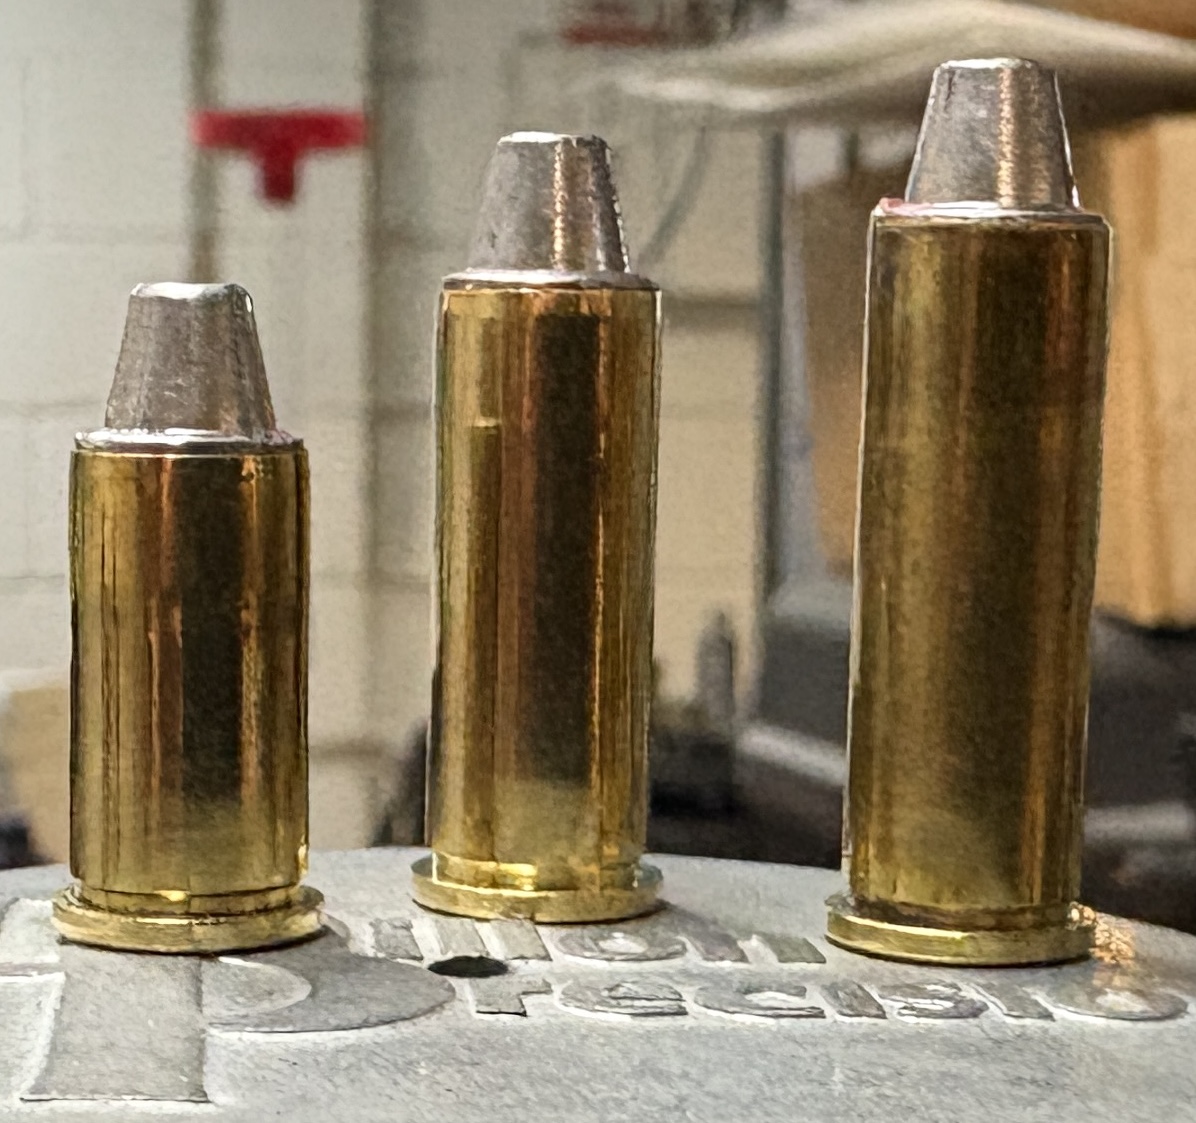
L-R: 38 Short Colt, 38 Long Colt, 38 Special. Loaded with The Cast Bullet Shop #M38-100SWCFB You are probably wondering about the reason for the initial selection of the 38 Short Colt case- and the answer is simple, though two-fold:
1) There is the question of what sort of service ammunition was available for issue to soldiers for their service revolvers. One resource, the field manual FM 23-35 Pistols and Revolvers, indicates the availability of 38 Short Colt ammunition with either 120 or 130 grain bullets to those soldiers who were issued the 38 Colt’s Detective Special. How many of either the ammunition or revolver that would have been available for issue is another matter entirely. And then there is the question, “for what purpose,” would 38 Short Colt ammunition be issued for? Training/low recoil seems a likely reason. What doesn’t seem likely is that the 38 Short Colt ammunition was leftover from when the Colt Navy revolvers had been issued after the Civil War. And also, strangely, there is no spot on the list for the 38 Long Colt, which was the revolver round up to, and famously used in, the Philippine War at the turn of the century. In any event, the 38 Short Colt was ammunition that could have been issued to soldiers around 1960, putting use of this round well into the modern age.
2) It is the smallest case that will work in a 38 Special or 357 Magnum, which is probably what 95%+ of revolvers are chambered for on the line today. Why pick a small case? To avoid inconsistent ignition. It is a bit of a pet peeve, but many older cartridges were designed around black powder as the propellent, which required more room in the case (for an equivalent amount of energy) than the smokeless varieties of today require. As such, there is a great deal more room for the powder to shift around in the case, which depending on the powder and primer, may not always sound or feel the same, which is jarring while shooting. Removing interior space by selecting a smaller cartridge case with its reduced volume, may eliminate off sounds and inconsistent recoil using smokeless propellent. Of course, this cartridge selection generates another potential problem: that of case/chamber fit.
If there is any consensus, it seems there is no consensus on whether and to what degree using a shorter case in a longer chamber does accuracy wise. There are many comments across many different forums that run from there isn’t a material difference to yes, Martha, this matters. One thing research turned up that is universally agreed on, however, was that using shorter rounds- say a 38 Special in a 357 Magnum- in longer chambers meant that you run the risk of not being able to use the longer round in the chamber due to the fouling having moved back from the cylinder throat into the chamber proper. It isn’t anything that cleaning won’t fix, but it does bear mentioning, if only so you don’t panic when you swap shells around and find the longer ones don’t seat quite right.
For completeness, here is a thread of a person indicating that minimizing headspace is key to best accuracy. And here is another where someone believes that it doesn’t matter at all.
When there seems to be wildly divergent views on any particular topic, it generally means that there really isn’t enough data available to determine one thing versus another. After all, everyone is entitled to their own opinion, but not their own facts. If it were fact that accuracy was degraded by using the shorter case in a longer chamber, then the entire experiment would run afoul of requirement #1 -be accurate. And that, on its face, didn’t feel true to my experience (such as it is).
At about this point in my research, what I had originally wanted to achieve had turned into a quest for an answer to this bigger question. So, how to answer it? First, it was time to go shopping. I had KKM build a 1911 pattern 38 Special barrel with 1:18 twist; in this way, I’d be able to test for any effect using my barrel tester using this twist rate as an analog for an S&W revolver barrel. This accomplishes at least one item that seem to be important: it removes any question of having a “bad/sour chamber” negatively impacting results. The test here is whether case length matters vis a vis fixed chamber size, and not how well a revolver is (or isn’t!) built. One chamber and barrel is easier to clean than 6 chambers and barrel, too.
The next item was to pick up brass cases. I have plenty of 38 Special cases, so I ordered 38 Short & Long Colt from Starline, which kept all cases the same brand. Not sure that this matters, but it seemed prudent to do in order to eliminate the potential for different brand cases to affect the results.
Next came bullets. In order to properly compare the three parent cases appropriately, the same bullet would need to be tested across all of the cartridges. What also might be a good sub-experiment is to see if the barrel preferred either round nose or semi-wadcutter bullets- something many people also disagree on. I selected two: Bear Creek 125 RN, and The Cast Bullet Shop 100 SWC. The CBS bullet was selected because it was relatively close in wight to the older style 80 (1851 Colt Navy) and 93-95 grain historical loads. The Bear Creek was selected because its weight and profile would be comparable to other 38 SC and LC historical loads, while also being a good candidate for the 38 Special. Last, two runs across the cases is better than one, and may prove insightful in case the results from each run do not correspond.
The final step was to select the powder and primers to be used. Today, we are so spoiled for choices in smokeless powder; if you can’t find one that does what you want to do, you aren’t trying hard enough. The selection would need to account for being able to be used across the three cartridges; again, to help with consistency and comparison. Which also raises another problem: in what way should these loads be similar?
Part of the difficulty with this experiment is how to characterize each of the various loads and whether or not they can really be compared. Is it velocity or pressure that should be compared? What about neither, while keeping close to historical loads that may be considered optimum? All three seem like reasonable, valid approaches. The later option seems difficult to form consensus on: what loads for each cartridge would be considered “optimum?” That leaves pressure and velocity. Of the two, velocity is easy enough to measure using a chronograph. Pressure data, on the other hand, is not nearly so easy to capture.
This problem notwithstanding, when discussing the effect of chamber length on accuracy, no one is generally concerned with a difference in pressure between cartridges, and by extension, velocity. The concern is solely and usually stated as mechanical fit of cartridges to chambers is better or more successful when cartridges are paired with the proper chamber dimensions. With that in mind, the first test between the cartridges will focus on velocity corresponding equally across the cases and bullets. The second run will use software to model the charges to equivalent pressures across all three cartridges.
For the initial test using velocity as a constant, a suitable quantity of Winchester Small Pistol primers was selected from a single lot. The powder selected for use in all three cartridges is Winchester 231. W231 is a well documented powder and is able to be used in all three cases with currently available load data; this feature will also come in handy for using modeling software to approximate pressures for each of the three.
-
How To Examine A Revolver
At the conclusion of the 2024 Georgia Regional, after the $100 bills were randomly drawn and awarded, the prize table was picked over for treasures, and everyone had their fill of fried chicken, you’d think it would be time to say goodbye, pack up, and head home. But not this year!
By sheer luck, the shooters assembled were invited to an impromptu “All Things Revolver” class presented by Sgt. Dan Byrd and Sgt. Jason Gregoire of the AMU. Gregoire presented his part of the class first, with tips about how to train for the CMP Service Revolver event. The second portion of the even was hosted by Byrd, who is a gunsmith-turned-shooter on the Precision Pistol team. His recent accomplishments include the Presidents 100 and is a member of the AMU team that won the Gold Cup Trophy at the 2024 Nationals.
When these guys talk, it pays to listen.
Byrd shared his tips on what items to be on the lookout for when either purchasing a new-to-you revolver, or tests you might perform when checking your own equipment. In what follows, any errors or completeness issues are mine- could only take notes so fast.
In no certain order, examine the following:
- Honest Wear: the idea is that honest wear, such as from riding in a holster, generally is a cosmetic issue only. When you notice deep dings or scratches, that’s the time to be concerned.
- Sideplate Marks: Following along with wear, examine the edge of the sideplate to make sure that the fit is exact and right. If there has been abuse to the revolver’s internal works, a tell-tale sign is that the edges of the sideplate will be nicked from improper removal.
- Screws: Similar to sideplate marks, if the slot in the sideplate screws have been been torqued such that cam-out has occurred, this again is a sign of mistreatment.
- Even Barrel/Cylinder Gap: What you are looking for here is an even gap between the entire cylinder face and the back of the barrel. Generally, using a feeler gauge is the way this is checked.
- Endshake: Checking for this is relatively straightforward; when the cylinder is in lockup inside the frame, note if there any horizontal movement from front to back while gently pushing on the cylinder to determine if there is any movement. Any excessive movement (more than just a couple thousandths) indicates endshake.
- Rod Runout: With the cylinder opened, spin the cylinder and watch the rod to see if it rotates in a non-symmetrical manner. If so, this indicates that the gun could have been mistreated.
- Bent Crane: This, along with rod runout, can be the result of “hollywooding” the cylinder closed. Please don’t do this. In order to check for a bent crane, first examine the mating surfaces between cylinder yoke and revolver frame. If this looks good, use a gauge pin or range rod of appropriate caliber to see if each cylinder is lining up with the bore. The tell-tale sign of a bent crane is shaved lead from a bullet not entering the bore coaxially.
- Check Wobble: Wobble can also be induced from improper loading. Wobble is the amount of play the cylinder can rotate while in lockup. Fix is addressing cylinder stop and cylinder stop notches.
- Timing Check: Regardless of what kind of revolver you have, a timing check should be performed on all cylinders. The way to check if the timing is correct is to note if the cylinder stop engages the cylinder stop notch at the moment the hammer is pulled all the way back. Everything should click at the same time.
- Pushoff: This occurs when improper stoning work has been attempted between the hammer and sear (which is located on the trigger itself). This can be easily tested for by pulling the hammer back until it stops. Once done, gently push on the back of the hammer towards the cylinder. If the hammer releases, without pulling or using the trigger, this indicates an improper trigger job has been performed.
Thanks to Sgt. Byrd!
-
Timed/Rapid Fire Grip Technique Video
Sgt. Jason Gregoire, of the Army Marksmanship Unit (located at Ft. Moore, GA), is the 2023 Georgia State Match Pistol Champion & Match Winner, and also won the CMP Service Revolver match at the 2023 National Trophy Pistol Match & CMP Championships at Camp Perry, OH.
Additionally, he is a CMP Distinguished 22, Service Pistol, Service Revolver and Air Pistol shooter, along with having earned his Distinguished Revolver badge from the NRA. In addition to being in the 2600 Club of both the NRA and CMP, he was the Presidents 100 match winner in 2022.
Jason, having the heart of both a true competitor and teacher, was kind enough to video, in profile, his technique for shooting timed and rapid strings using his revolver. The video is below:
A couple of points to note:- In order to make ready for his next round, you'll note how quickly he moves his trigger finger away from the trigger after recoil.
- Watch the move he makes at the backstrap when he is manipulating the hammer between shots.
Thanks to Jason for sharing his technique!
-
How To Grip a Revolver for Single Action Shooting
Much of today’s literature about pistol shooting focuses on action shooting disciplines (e.g. IDPA, NRA Action Pistol, USPSA) and semi-automatic pistols. This isn’t surprising; with the advent of modern machining techniques and design, such pistols are very competitive, both in price and for sport, in addition to other benefits such as ergonomics and reliability.
Revolvers, long the friend of the lawman, cowboy, and outlaw, began to lose market share in the mid 1970s, and while the gun press still writes the occasional article that “this is the year of the revolver,” it is unlikely that we will see any such resurgence of the wheel gun, unless perhaps semi-auto pistols are regulated in some way to influence sales.
The number of shooting federations devoted exclusively to revolver competition is small (e.g. Cowboy Action Shooting and ICORE). With such diminished interest, the incentive to write about tips and techniques simply doesn’t attract the necessary advertisers who can pay for content. The list of big name authors on things revolver- Keith and Jordan with contemporaries Roper, McGivern, and Hatcher- are all long dead. Of today’s authors, John Taffin and Grant Cunningham are both well known for books and articles on revolvers, with Cunningham especially and explicitly writing about shooting technique (though his focus is on the two handed variety, which is of little interest here). Nevertheless, this is an explanation behind why it is difficult to get an easy answer to the question of, “how should I grip a revolver for one handed shooting?” The purpose here is simple: providing just such an answer to that question.
A brief note before starting out: in what follows, please don’t take the below as in any way dismissive of the double action revolver shooting crowd; if you work at it, like just about anything else, you can certainly be successful enough to either place or win an event. Joe Chang and Greg Markowski have demonstrated this in our sport. Moreover, according to very accomplished revolver shooter Fred Romero, in Police Pistol Combat (PPC) shooting, double action revolver shooting is the technique that the majority of PPC revolver shooters used (the discipline is now mostly dominated by semi-automatic pistols, in what few matches are contested today). Give it a try; it may work for you!
Nevertheless, it appears that many in the precision pistol community do not use the double action shooting technique, instead preferring single action shooting, which, for clarity, means cocking the hammer with your firing hand, aiming, and executing your trigger press from said hand to complete the shot process.
Of the single action revolver shooters, there appear to be two schools of thought: 1) the “two different grips” school, which advocates for choking up as high as possible on the stocks for slow fire, while using a lower grip on the stocks for timed and rapid fire in order to move the thumb for cocking a bit easier, and 2) the “single grip” school, that uses a centered grip for slow, timed, and rapid fire.
The benefit to using the “two different grips” method is that one can theoretically manage the recoil better in slow fire since the barrel itself will be better in line with the arm. And, since you may cock the hammer with your non-shooting hand during slow fire, one may find a higher grip more comfortable. The downside to using the “two different grips” method is that you may not remember to choke up or down on the stocks, depending on what you trained for during a specific course of fire. Also, learning two different grip styles adds complexity in a task that is already difficult. Lastly, the high grip style utilized for slow fire in this method tends to make cocking the hammer difficult (from the firing hand), which can lead to instability in your grip as you adjust your hand to compensate should you wish to cock the hammer from your firing hand (more about “breaking your grip,” below).
The “single grip” school has the benefit of being less complex, since there is only one grip position you need to learn. With this simplicity comes the necessity to find the proper stocks that fit your hand- the revolver has to fit your hand well enough that the motion you make with your thumb to cock the trigger does not negatively impact your grip cohesion between the fingers on the front strap and the breadth of the back strap in the palm of your hand at the base of the thumb. Specifically, the back strap should fit between the thenar and hypothenar/interdigital area of the hand, bifurcated on either side, by your stocks. In this way, a revolver should feel similar to a 1911 when located in the hand properly. However it feels to you, make sure to use the same gripping technique to locate your revolver in your hand for maximum control, focusing on both consistent and correct placement. Only after the revolver is located in your hand in a consistent and correct way, should you concern yourself with how comfortable the revolver feels in the hand (i.e. stippling). As crazy as that may sound, the rule is simple: it is more important to be correct than it is to be comfortable.
Regardless of which grip school you subscribe to, the next item to consider is how you will cock the hammer in timed and rapid courses of fire. The ability to reach the hammer with your thumb is a direct result of how you have gripped your revolver. Any tweaking you need to do to your grip placement will be the result of the distance between your hammer and thumb, along with the necessary motion required to cock the hammer. A successful approach here will be one that considers making the least amount of movement in order to cock the hammer (which you should also consider when determining where the thumb should rest between cocking the hammer and firing, too). After this point, there is some controversy. That controversy is on the matter of “breaking your grip.”
First, a description as to what “breaking your grip” is, generally: understood by degrees, to adjust your hand away from what is customarily required by you for a successful shot. A description specifically for revolver single action shooting: to allow grip pressure between the front strap (your fingers) and back strap (your palm) to relax such that the motion to move the thumb to cock the hammer can be made efficiently. Put another way, the trade-off is between 100% continuous, non-movable, stock and hand cohesion and, well, something other than that.
Thus, the two sides to this particular debate are either in favor of, or believe against, “breaking your grip.” A possible reason for the disconnect between these competing views likely stems from how hard you grip the revolver, your hand construction, and intrinsic finger dexterity. Such personal details will necessarily dictate your default state, and to some extent, the way you may be able to develop. Also, it may be the case that the experience you bring from other shooting areas influences your particular view, such as what is required for successful 1911 platform shooting coloring the remaining areas in which you participate.
Here, it is more important to practice what is most successful for you. Try both techniques, in so much as you can, and see which brings you better results. The shooter may be pleasantly surprised with his or her results after making a change between 100% grip tension and a grip with slightly less tension that allows more mobility to work the hammer with ease. Said another way: there could be revolver shooters who are successful shooting single action style without any change in grip tension when cocking the hammer; however, these people are likely very, very few.
These items taken together can dictate whether and how you will be able to manipulate the hammer with the grip that is best for your shooting. It is more important to determine, through experimentation and considered practice, what technique is most successful between your hand, equipment, and results on the target. Let results be your coach and modify accordingly.